How to Set Up Blink Outdoor Camera (Video Walkthrough)


When you buy through our links, we may earn an affiliate commission.
Having a Blink Outdoor Camera helps protect your home and keeps an eye on your neighborhood’s activity. The best part about the Blink camera is that the set-up is fairly simple and can be done entirely by you at home.
Below, we’ll cover the steps necessary to get your new Blink Outdoor Camera set up and ready to monitor your home.
How to Set Up a Blink Outdoor Camera
The process of getting your outdoor camera up and running consists of four different steps:
- Install the Blink app and create an account.
- Within the app, add a Sync Module and create a system.
- Add your Blink Outdoor Camera(s) in the Blink app.
- Mount your camera(s).
These steps are easy to follow and should not require a professional’s assistance, so you can get started with your camera in no time!
Download the Blink App and Create an Account
The first step in setting up your Blink Outdoor Camera is downloading the app and creating an account. This step is only necessary if this is your first Blink product and you do not already have the app and an account made.
Follow these exact instructions to install the app and create an account:
- Download the Blink app.
- Open the app and tap the “create account” button.
- Select your country and region.
- Enter your email and create a password for your account (this will be your information for logging in every time, so make a note of your log-in info after creating it).
- Verify your email.
- Enter the phone number you will associate with this account.
- Verify your phone number.
- Link your Blink account to your Amazon account.
After following these steps, you should have successfully created your Blink account. Ensure you have added all of your correct information because the app is where you can control and view your camera feed, so you will need to log in frequently.
After completing this step, you can move onto the next step.
Add a Sync Module and Create a System
After setting up your account and having the app all ready to go, you will now need to add a Sync Module and create a system. This is an integral part of the process because the Sync Module (the hub) is necessary for Blink cameras to function. You will primarily use the Sync Module to connect your cameras to it and the Blink app.
When you connect your Sync Module, you will be creating it under a “system.” The system is basically a category that your camera will be listed under. For example, the cameras located outside your home in the front can all be under one system with the Sync Module.
Follow these exact steps to add a Sync Module and create a system:
- Open the Blink app and select the add a device button (“+” button in the top right corner).
- Select the correct device from the device options list (Select Blink wireless camera system if this is your first time setting up any device. You will be adding the Sync Module with this option, which you need to be connected to first; then you can add cameras after.)
- Scan the QR code or enter the serial number that is located on the Sync Module.
- Create a new system that your device will be located under (Use the location of where you are placing the camera for the system name. Example: Home Front Yard.).
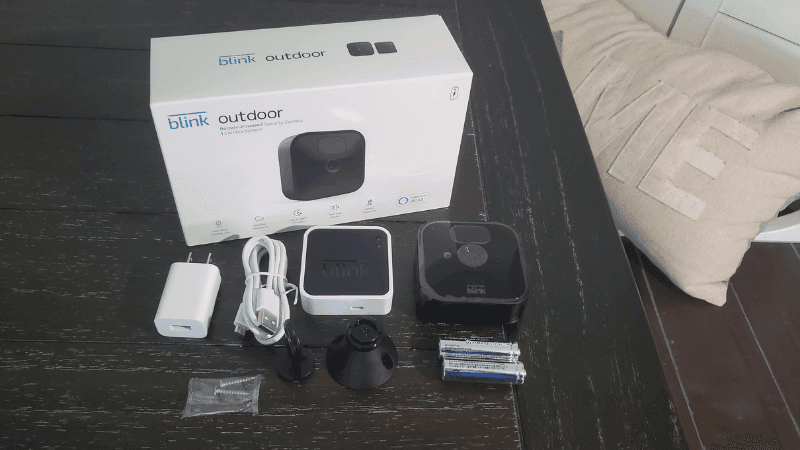
- Plug in your Sync Module and wait for it to start blinking blue from one light and a steady green from the other light.
- Select the Discover Device button.
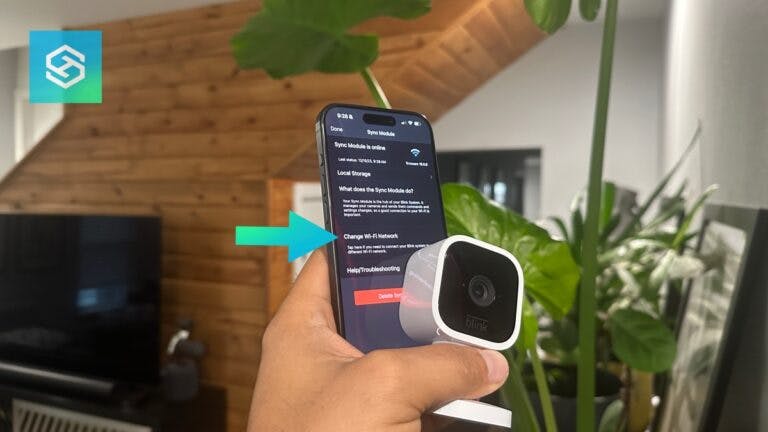
- Your app will then need to connect to the Sync Module’s Wi-Fi which is called “BLINK-” followed by four digits. Select “Join.”
- Next, connect your home Wi-Fi through the app as well. Select your Wi-Fi and put in the correct password.
- Your network should now be connected, and you can hit the Done button.
After your network is successfully connected, that means the Sync Module was successfully connected under the system, and you can now finally add your cameras.
Adding Cameras in the Blink App
Once the previous steps are complete, you can finally connect your Blink Outdoor Camera(s) to finish the process of getting everything connected.
Follow these exact steps to add your Blink Outdoor Camera:
- Select add device (“+” button in the top right corner) under the new system you just created.
- Select the Blink wireless camera option.
- Scan the QR code or enter the serial number located on your Blink Outdoor Camera.
- Your camera should be added successfully. If so, tap the Done button.
You can add more cameras under this system by following this exact process. You can also add cameras under different systems if you plan to place them in separate locations; just follow the “add a Sync Module and create a system” instructions again to add a new system, followed by the “adding cameras” instructions.
Mount Your Blink Outdoor Camera
Now that you have your Blink Outdoor Camera completely connected, you will want to find the perfect location for your Blink Outdoor Camera(s).
If your camera is under a certain system, you will want to place it in coordination with that system. For example, if you connected your camera under the “home front yard” system, you would want to place your camera somewhere in the front of your home to avoid confusion when looking through your camera feeds.
Blink suggests the best places to mount your camera by telling you areas you should avoid. While finding a location for your camera, avoid:
- Waving tree branches and shrubbery
- The sun
- Vehicles in distance
By avoiding these certain aspects when placing your camera, you will be able to find an excellent place for it that will stream a clear and open feed.
In Summary
Setting up your Blink Outdoor Camera is an easy process, but it does take a few steps. You will need to download the app and create an account, add a Sync Module and system, add your cameras, and then find a perfect location for your camera.
While this may seem like an intimidating process, it is actually quite simple and user-friendly. As long as you follow the instructions and in the correct order, you will have your Blink Outdoor Camera connected in no time.
Once you have set up your first Blink device, the process will become easier and quicker for devices to follow. Be sure to follow the given instructions here for your first time set up of the Blink Outdoor Camera; after that, you will be equipped to set up other cameras like it’s second nature!