The complete guide to Ender 3 3D printer

By Adama Brown,

When you buy through our links, we may earn an affiliate commission.
Interested in 3D printing, but don’t know the first thing about it or where to start? Here’s a tour through the basics of the Ender 3, one of the most popular entry-level 3D printers on the market.
It’s only in the last few years that 3D printing has really become practical for ordinary people to do at home, and that’s in part thanks to the Ender 3. It was one of the first relatively inexpensive models of 3D printer. Capabilities which used to cost thousands of dollars can now be had for a couple hundred.
The Ender 3 uses what’s called Fused Deposition Modeling, or FDM, to turn plastic filament into 3D objects. Essentially, FDM printers like the Ender 3 use a long spool of solid plastic filament as raw material. The filament is fed through a heated nozzle where it melts and is drawn onto the build surface in layers, usually between 1 and 2 tenths of a millimeter thick.
Think of it like drawing an animated picture one frame at a time. Each new layer is drawn on top of the last, building the object piece by piece until finally it’s fully formed. Depending on the size of the item in question, this can take anywhere from minutes to days.
What’s the difference between resin printing and FDM?
You may have seen or heard of printers that work on a different principle. Resin-based 3D printers, like this ELEGOO model, use as raw material a liquid which solidifies when exposed to intense UV light. By selectively hardening the material, they create layers which are then sandwiched together to produce the 3D model as a real live object.
The two processes have very different results. Because of the very precise application of UV light, resin printed parts have a much higher level of fine detail, which is why many people use them for printing figurines and other things which require precision. However, the resins they use are very brittle, and will snap easily under pressure.
FDM-produced parts on the other hand often require more effort to produce a visually-pleasing result, but are much stronger and more durable, able to be used for practical applications ranging from shelving to planters to everyday gear.
The Ender 3: an entry-level workhorse for the 3D printing hobbyist
The Ender 3 was one of the first truly affordable 3D printers, and even now some five years after it was first released, it remains one of the most popular models, along with a flood of upgraded models.
It also remains one of the most inexpensive printers, with base models frequently being available for well under $200. Much of that savings comes from the fact that the Ender has a very basic design. A few motors, a circuit board, and a heating element make up the bulk of its hardware.


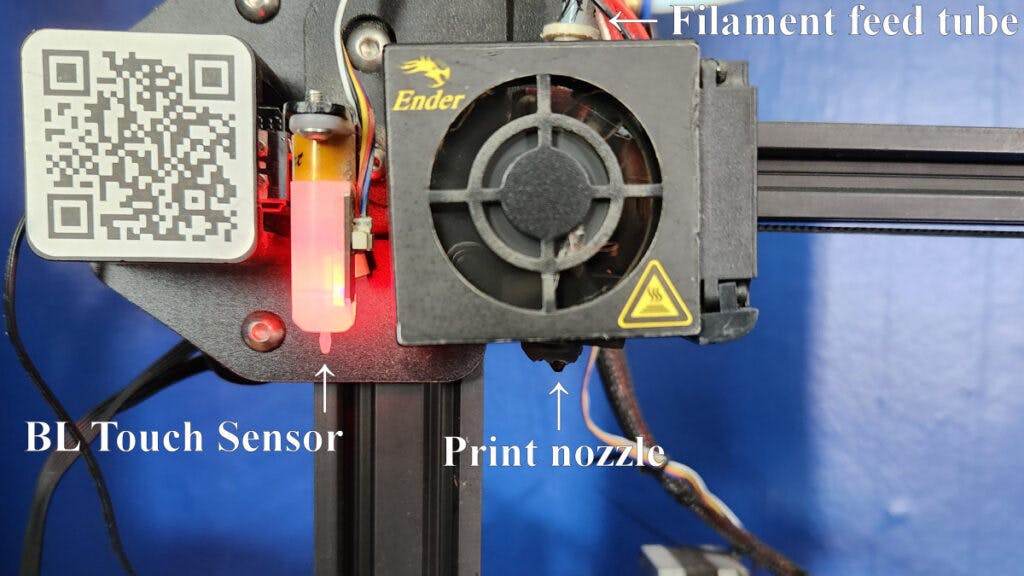
Here you can see the basic configuration of an Ender 3. Top mounted is the holder for the spool full of plastic filament that makes up the printer’s feedstock. The feeding mechanism slowly pushes the filament though a tube to the hotend, where it’s melted and squeezed out the nozzle.
The plastic is then drawn out onto the build surface to create layers. Three motors, one for each axis, move the print head and the build plate itself to provide access to any part of the 220mm by 220mm (8.66 x 8.66 inch) build area.
The simplicity of the Ender 3 is also its strength. They’re relatively simple to maintain, and most parts can be replaced without too much difficulty. Upgrades are almost as easy, with nearly every part able to be replaced, in many cases by upgraded versions.
Simple, durable, and upgradable
My personal unit, pictured here, includes a few upgrades I’ve installed since I bought it. Note that some Ender models may come with many or all of these upgrades already installed; with a wide variety of configurations to choose from, it’s important to check all the details when purchasing.
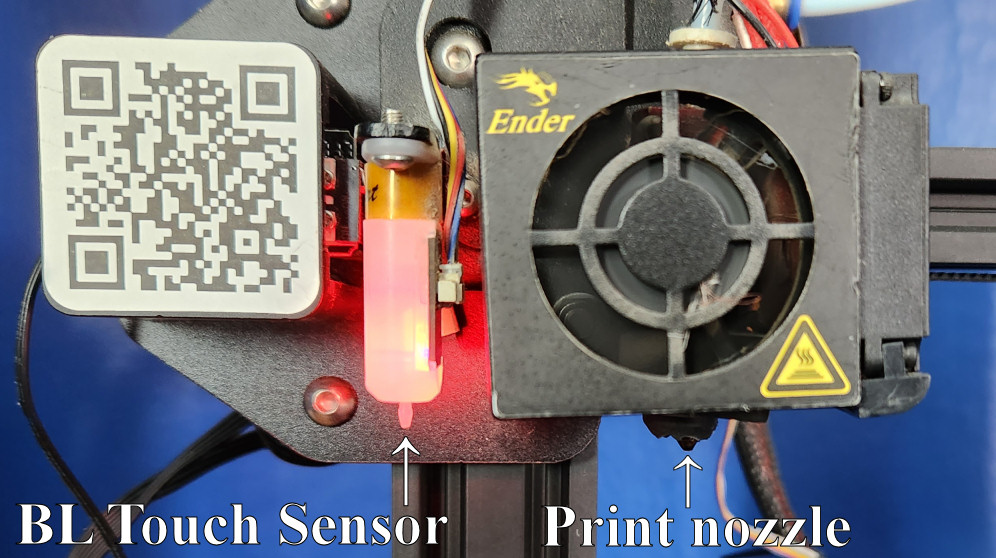
The BL Touch sensor helps the machine sense where the print surface is, and makes it easier to get good first layers, which are critical to successful printing.
The textured glass print bed offers greater durability than the plastic bed the Ender ships with, as well as improved adhesion.
When it comes to 3D printing, adhesion is important. If your first layer doesn’t stick to the print surface, bad things happen. Sometimes parts can warp, curling away from the print bed as the plastic cools, causing them to deform and become damaged.
In other cases, the entire part can simply pop off the bed and start moving around. When this happens, your printer nozzle no longer has the surface of the part to lay down the next layer on, and starts squirting plastic out into thin air.
If this isn’t caught quickly, you end up with a tangled mess of extruded plastic strands colloquially referred to in the hobbyist community as “spaghetti.” Having attempted prints turn into spaghetti is something of a rite of passage among 3D printing enthusiasts. Whether it’s caught quickly or not, though, the loss of adhesion ruins the print.
Tweaking and Printing
There’s more than just adhesion to making a good 3D print, though. Producing a quality print starts on your computer, with an application which takes 3D models and “slices” them to produce instructions for the printer. Cura is the standard program that comes with the Ender models.
Once you’ve set your printer type, Cura will let you import a model and tweak exactly how you want to print it. There are a lot of choices: layer height which trades speed for print quality, support structure (to hold up parts of the model that need it until the plastic has cooled), and “infill density” (how much plastic to put in internal areas of the part) which balances speed of printing and cost of materials against structural strength are just a few of the options.
Learning 3D printing is a skill, for sure, and one that it takes practice. But the results are worth it. You can produce wonderful items right in your own home, with the only limit being your creativity and the available 3D models.
Once you’ve chosen your settings, you can pop the memory card into the printer and let it go. The Ender 3 doesn’t require a computer connection to give it instructions; it’s primarily designed to run off a MicroSD card, although options exist to hook it up to a computer or a Raspberry Pi to give more control.
I’ve printed many very successful objects using only the standard setup, though. The printing process can be fun to watch at first, but goes very slowly.
In time though, the results are worth it. Take a look at just a few of the objects that I’ve gotten out of my printer.


Upgrades and improvements
As I mentioned earlier, almost every component of the Ender can be upgraded. That includes improved hotends for printing materials like nylon which require higher temperatures; different sized nozzles, which can increase your print speed at the expense of small details; and an all-metal feed mechanism to replace plastic parts, among other things.
There’s an equally large number of potential materials you can work with. While one type of plastic called PLA+ is the easiest and safest to use, there are many different types and colors to choose from, including translucent and even glow-in-the-dark.
You can also use more exotic materials like nylon for stronger parts, filaments infused with wood or metal for a different look, even filaments impregnated with carbon fiber.
All in all, the Ender 3 is a great first step on learning how to work with a 3D printer and additive manufacturing in general. I’d highly recommend it to people who want to take up the hobby, who want their kids to be able to experience and develop skills that will be useful later in life, or anyone who just likes making and customizing things themselves.